Showing posts with label sewing. Show all posts

Thursday, January 6, 2011

i love mutton chops - Vogue 1109


I have to start this post by saying that I LOVE THIS TOP. Yes, I freely call it my mutton-chops top, but I love my mutton-chops top!

It started out as Vogue 1109, a Sandra Betzina Today's Fit pattern. Kinda mature looking? Which is polite for saying my mom might like the seaming and colorblocking a whole lot more than me.

But those sleeves! The neckline interest! Those sleeves! It kept rattling around in my brain, begging to be made up.

New Year's weekend was my massive sew-stravaganza, and I made the white muslin of my prototype that weekend. I call it a muslin now because I totally screwed it up and it didn't fit right, but to be honest it was meant to be the final product.

See the big fat seam on the sleeve? That's because I sewed it inside out. Yay!


That's ok, I'm not ashamed to show my wadders. The prototype taught me a few things - the sleeves were way too short, the seam needs to hit below the elbow for the pleats to have their best dramatic effect. And let's see, what else? Oh yeah, be sure to sew both sleeves on the correct direction, that always helps tops look nice. Oh, and the neckline was a little chokey in front, so I lowered that by an inch.


A few days passed and I managed to cut out the second (and final) version, this time in a gray cotton/poly knit I scored at Hancock's in the super bargain section for $2.95 a yard. I can't remember exactly, but I think I used about 2.25 yards for this top? I cut it super long, it doesn't really need to be that long. I fully expect it to retract in the washer and dryer, so there's room for that.


After adding three inches of length to the upper sleeve and lower sleeve bands (both), and adding a little to the bodice length (OK, a lot, bordering on too much but ignore that part), I have what I call the perfect mutton-chops top. Soft, a touch slouchy without being sloppy, with full distinct sleeves you just don't see on every Mossimo t-shirt from Target.


I can't wait for spring, I have BIG PLANS for these mutton-chop sleeves again. Stay tuned.

Tuesday, January 4, 2011

Dalsland Wrap - post post

I had some thoughts today about the Dalsland wrap tute I thought I should share, in case anyone out there decides to make their own version.

My shoulders measure 21" across the back. If yours are wider, you'll need a length of fabric longer than my original 116". So the wider the fabric you can find, the better. Or if you happen to have a long strip of fabric left from a different project, you could practice to see how long you'll need. You can always hem up the bottom shorter once it's done so the tails don't drag on the floor.

If your shoulders are not as wide, you can either keep the 116" length and simply make the armholes longer than 9" (giving you extra fabric coverage in the front), or you can adjust your length down to 98" or so (the length I used in my cream colored prototype that didn't fit me).

The Dalsland wrap in the store is made out of a patterned doubleknit that is almost reversible, and I saw a few options online that I could see would be awesome. Something like this or this? That way, when the inside shows, you get a flash of a different pattern!

If you do make one or need help, just email me! Happy sewing.

Monday, January 3, 2011

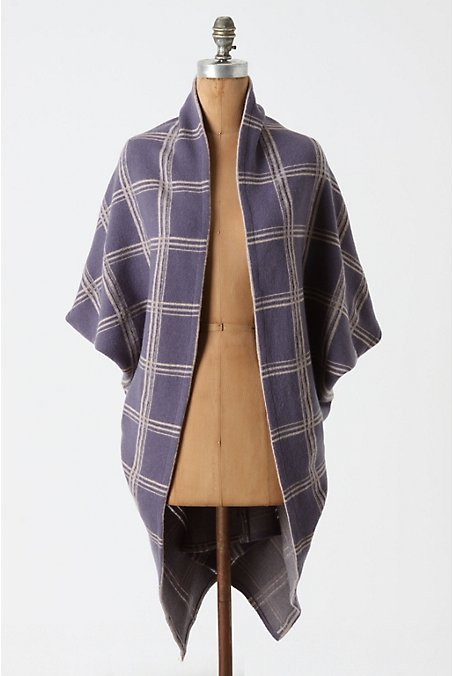
Dalsland wrap - an anthro knockoff - with tute


I stopped by Anthropologie the other day, just to see what was on sale and what this Spring is going to look like. I do shop there occasionally, but what with my whole "buy less, sew more" mantra these days, I am trying really super hard not to bring home anything I don't really really really need.

I did find something super darling, though! It's called the Dalsland wrap, and there was only one of them in the store. I totally scoped it out, even sitting down on their couch to take measurements and figure out how they constructed this doohicky. It's made out of a lovely substantial doubleknit.


Then I came home and scoped it out online some more, and then I made a prototype out of cream organic cotton sweatshirt fleece on my shelf.


The great news is that out of ten reviews, it gets almost five stars! The bad news is the prototype doesn't fit me, sadly, but I learned a lot from it and in my second try ~ voila! My own personal version of the Dalsland shrug in alpaca/wool/nylon yardage from my own stash (plus), and the whole thing cost me $12 instead of $118 (another plus). If there's anyone out there reading this who wears a size 4 or possibly 6 and wants the cream sweatshirt wrap, just send me an email and I'll mail it to you. Thanks, she found a home!

Here's a quick tutorial, with diagrams instead of pics because it's a tad confusing.

I am a tall size 8 or 10 in RTW, so these measurements are based off of that and off of the Medium sized shrug in the store. The prototype I made would fit someone with smaller shoulders, maybe a 4-6?

You need a long strip of fabric, 24" wide by 116" long. I cut two pieces of sweater knit, each 24" wide by 58" long. Serge all four long edges. If you're buying yardage, that means you will need 1 1/3 of 60" wide fabric, and cut it in half.

Because I didn't have one continuous piece of fabric 100" long, I seamed my two 58" pieces in the middle, and made it a flat-fell seam because you may be able to see it when or if it folds over. This is optional (the flat-fell part, you really do need a seam).


Then fold the piece, right sides together, at the center back seam. You will be stitching closed the bottom 20".


Now for the hardest part, and it's not too hard. You will open up the piece by holding the center back seam and the seam you've just sewn in each hand, right sides together, matching the two seams up and pinning them together. Leave 9" (or more, this becomes your sleeve opening) open at each end, and stitch this seam closed.


To finish, turn under the serged edges 1/2" and stitch the hems down. I also stitched down a 1/2" around the armholes.

This is the easiest project! The hardest part is envisioning the "envelope" when you pull the two seams to the sides. The great thing about the Anthro site is you can zoom in on their finished product and actually see some of the construction of it.

I'd love to see if anyone else makes one of these wrap/shrugs/cardi/thingies!


Enjoy!

**Edit: I've added some additional thoughts on sizing and fabrics in a second post, here.

Sunday, January 2, 2011

My goals

I started a "that what I made in 2010" post a few days ago, but after spending what felt like sixteen hours and realizing I was only through April, I junked it and decided to focus on what I'd like to accomplish in 2011.


Last year I started off with the lofty goal of sewing my way through the Twinkle Sews book. I'm sad to report that I never even completed one of the projects in the book, as I was waylaid early on with the Jazz Hall skirt and its flounces that didn't fit. Maybe I'll pick it up again this month and give it another shot. Or not.

Here's what I do know I'll be doing. I'll be spending the next few months sewing only with fabrics already in my stash. My goal is to keep my fabric additions to an absolute minimum, and sew up as many projects as I can with fabric I already own. I signed up for the Pattern Review stash-busting contest so that I could keep some sort of record of it, but I'm fairly confident I won't come close to winning.


I have a real drive to reduce my consumption right now, and to not let my hobby become excessive. I had some fabric in my checkout basket at Fashion Fabrics Club the other day (luckily, located here in town so I don't have to pay for shipping) and I deleted it, telling myself "that's excessive, you do not need more fabric, Heather."

I've written over the past year about my ambivalence towards things I make. I don't tend to wear them, for whatever reason. I have already started trying to focus my sewing on things I will actually wear. It sounds simple, but it's actually very difficult for me. The physical act of sewing is very cathartic for me, as is the cutting and planning that goes before that.


I think a lot of my troubles with wearing my own made items come from my childhood, so you may have to tolerate some pop-psych posts as I try to work my way through those hang-ups. If I don't, I may never get to actually enjoy the product of the craft that I love so much.

I'd also like to get really really good at something this year. I haven't quite decided what it's going to be yet. I imagine setting some sort of goal like becoming expert at sewing with knits, or setting in welt pockets, or fly zippers, or pattern drafting.

Anyhoodle, enough blabbing! I have to get back down to the sweatshop and start cranking out some knits. Stash busting? Check. Sewing with knits? Check! See, I'm already on a roll.

Wednesday, December 29, 2010

the Liverpool interruption

I've taken a short break on sewing the vintage Patou jacket. Partly it's because of Christmas, partly because my mojo is missing right now, and partly because I wanted to make my mom a Liverpool shirt to take with her to Florida.


She came over today, so I showed her the progress and she ended up taking it home to finish the hem and buttons! Honestly, I did not mean to do that to her this time but she insisted.


She had admired the pattern cover photo with the shirt made up in this print, so I decided to use up some fabric stash and make it for her. Little did I know this time the pattern was going to give me fits. I put the collar on three times. The cuffs twice. By the time I sent it home with her I was glad to see it go!


Now, back to my regularly scheduled jacket sewing. Maybe.

Thursday, December 16, 2010

Simplicity 2700 - Close, but no cigar

Now that I'm sewing again, I'm determined to only make things I want to wear. It sound obvious, right? Sadly, for me, it isn't always that simple. I tend to enjoy the process of sewing a whole lot more than wearing the finished product. I will never be one of those people who makes their entire wardrobe, I know that much.

But I do enjoy sewing and I love fabric, so I'd really like to occasionally be able to make something that adds to my wardrobe and certainly doesn't scream I MADE THIS AT HOME.

Here's where my latest project comes in. For work in the winter, I typically wear dress pants and a blouse or sweater. I used to exclusively wear Banana Republic pants and suits because they fit me the best, but their fit and sizing had changed in the last few years so now it looks like I'm wearing mostly J Crew dress pants, suits, and blouses.

I have had this beautiful piece of black pinstripe wool/lycra in my stash for the last two years, so I pulled it out this week, determined to make an exact duplicate of the RTW pants I love so much. I even traced the front and back of my J Crew pants and made a muslin of those, contemplating the idea of drafting my own pants pattern. Then I scratched that idea and poured over every single pants pattern I could find. I spent countless hours on Pattern Review.


And then I chose Simplicity 2700.


That was my mistake.


Here are my thoughts on this pattern. In no particular order because I'm tired and frustrated and considering taking a class in trouser construction/pattern drafting.


The RTW pants I love have side seam pockets, and S2700 have diagonal slash pockets. This is a HUGE difference. The look is just not the same. I cannot get the hips to lay flat to save my life, and I'm convinced it's because of the pockets.


I insist on welt pockets on the back of all my dress pants. Not because I want to stash a bunch of things, but because my fanny looks bad unless it has some extra construction framing it. That sounds strange, but it's true. My butt needs more covering than a single layer of fabric.


The waistband on my RTW pants looks to be constructed separately and then applied to the pants. In S2700, they instruct you to sew the waistband pieces to the leg sections and then stitch the pants together. In my opinion, this creates a look of a yoked pant instead of dress pants with a waistband. Come to think of it, I have some J Crew yoke-style pants with diagonal slash pockets and no back welt pockets, and they aren't my favorite. They tend to "grow" as I wear them, falling down on my hips. I digress. I also found the waistband to be way too wide and the rise to be about an inch too high for my taste. That was an easy fix, though.


If you're new to sewing, DO NOT BUY THIS PATTERN. The instructions for almost every step were ridiculous. The zipper?! Holy cow, they must not have wanted anyone to ever attempt a zipper fly insertion ever again. I didn't even follow the rest of the instructions because I was so peeved with the zipper portion.

The finished product is okay. I'll wear them, I'm sure of that. I just don't love them and I really wanted to love them.


I cut the Slim version, after comparing Slim and Average and realizing there is very little difference. I often find patterns for clothing to create a much more voluminous end product than what you find in RTW.

Final judgment? Close, but no cigar. Next time I think I'll actually try to use my self-drafted trouser pattern to re-create the J Crew pants I love.

Friday, August 27, 2010

I'm coming back

Yay, my self-imposed exile may be coming to an end! I'm so happy, I've missed sewing and at the same time had absolutely no interest in it at all. Life in all other areas was way too chaotic to even consider going downstairs to sew, I think that may have had something to do with it.

It's not that things have calmed down any, but I found some inspiration last month that has helped me get over the hump.

I found Kelly and Sewing In No-Man's Land.

Have you read this blog yet?! It's awesome!

Kelly does exactly what I always wanted to do with this blog. She drafts patterns for her own designs, and then she posts them for FREE on her blog, along with the tutorial and beautiful pictures. It doesn't hurt that she lives on an island near Indonesia with her adorable family, and she's a professional photographer. So her blog is stunning to look at, and helpful and fun.

Check it out, you're going to love it. And maybe, just maybe, I'll be able to take her lead and finally get some of my ideas out of my head and under the needle.

Saturday, July 10, 2010

My future

It's been such a long time (months!) that I've really sat down to sew anything serious, that I'm trying to get my mojo back with some ideas first.

I bought this book, Sew Serendipity, and luckily for me there are a ton of projects I could see myself not only making, but wearing. Wearing is always the hardest part for me.

The skirt on the front cover is at the top of my list. I even have most of the fabrics already lined up! I plan on making it in a natural and black color pattern, with ticking stripe and natural linen mixed in there somehow. I know it sounds nuts, but it's all based off the most adorable octopus apron I saw last week.

I even own this yellow and gray fabric! I don't think I'll make this coat in this fabric, but I thought it was funny that this print from JoAnn's made it into the book.


I do so love this little ruffly jacket, I think she made it out of silk and linen. I think it would be adorable in vintage fabrics? I have a little vintage apron that would be great as the trim ruffle and color overlay... I might just have to do some fabric shopping this week for the body, which I think would be super cute in a washed out barkcloth, or a heavily textured linen.


Then I also got the latest Ottobre kids magazine in the mail this week, and there is the most perfect little boy's coat pattern (#18, the Naava coat)! Every year I buy each of my kids a coat like this, usually from Janie and Jack or Gap Kids. This year I'm going to make one, if it kills me (and it just might).


They call for fusible fleece as an underlining. I've never used it on a garment before, so it should be fun. The kind of fun that makes me question why I chose sewing as a hobby?


On the last page, they always show a little teaser for the next issue. This time, it's going to be the women's magazine for fall/winter, chockablock with coats and jackets. I love getting Ottobre in the mail, even if I rarely get a chance to sew from them anymore.


Wednesday, May 26, 2010

My first dip in the pool

I've never made swimwear before. We went to Hawaii last Thanksgiving for a family vacation, and I started thinking "why can't I make a swimsuit?" It's not like there's a lot of fabric involved.

So when I got back I read a few online tips on sewing swimsuits, and promptly put it all away, not to be seen again until this week when the weather turned freakishly hot and suddenly we're longing for our neighborhood pool to open to we can go swimming.

I didn't want my first swimsuit project to be for me. Let's face it, after it carried two rather large (9 lbs and 9 1/2 lbs) boy babies, plus the accompanying 50 pound weight gain with each of them because I really like to gain a lot of weight when I'm pregnant, my body has issues.

She ain't what she used to be.

Much study will be involved when I finally get down to making a swimsuit for myself, and there will be control-garment textiles involved.

But my boys are another story. I recently got the Boden Kids catalog and in it were these so-cute-it-makes-me-sick swim trunks. My boys don't have body issues, they just like to have fun.


I dug out my 3/2009 issue of Ottobre, the one with the adorable spandex swim trunks (style #40), and set about recreating Boden's latest cuteness for a whole lot less money.


I wish I could find spandex with sharks or alligators on it. I can't. I did find a nice bright blue stripe, though, so that's what I used for my first attempt at trunks for my older son (4).

The first attempt went in the garbage can. But! The stripes matched. So that's a plus.

The piping, on the other hand, was from hell. I started off by basting it to the front section with my sewing machine. In the second version, the version with non-matching stripes because I'd used up all my matching-stripes lycra, I sewed the piping to the front section with my serger. I'll post all my tips below.

These are the second attempt.


I didn't take a picture of them on my son, so you'll have to take my word for it how cute they are. Let's just say I could barely contain myself when he put them on, they're so stinking cute. I gushed. I oohed, I aahhhed. Even my husband gave him a high-five and we told him he was destined to be the fastest swimmer in the pool in these trunks.

I know in these pictures the stripes and the entire finished product looks kind of wonky, right? Well, I think that's just how spandex fits on my mannequin. On my son, they fit super nicely and lay flat and everything you'd want them to do. And the mismatched stripes weren't at all so offensive.


The fit, as I've found with all Ottobre kids patterns, is perfect. Here are some of the finer details I didn't photograph:

1. I used bulky nylon in my serger, for all four threads. I only had four colors of bulky nylon thread, so I used all of them and it really didn't turn out too bad! I'd never worked with it before, but I'm really happy I did. Bulky nylon is just made for spandex, that's all there is to it.

2. For the waistband elastic, I used a large zig-zag on my sewing machine (and a stretch needle in size 80), and stitched 3/8" clear elastic onto the inside of the waistband, stretching it a little as it went along. I stitched down the waistband, then I threaded a nylon drawstring through the channel and that's the tie you see in front. The worst part of the whole waist assembly was the buttonhole I had to sew on the spandex. Yikes! I interfaced it, thank goodness, and it was still hell.

3. I used a stretch double needle for the leg hems and for the waistband attachment, because of its stretchiness. I didn't use bulky nylon on those seams, but I think in the future I would get another spool and use it on everything, or simply swap it out from the serger. I was lazy, I used polyester Gutermann thread for the hems and topstitching.

4. Spandex walks, and it stretches. It was much easier to work with on my serger than the regular machine, if you can believe that. I don't usually think sergers are easy to sew on, but this time I was wrong.

Saturday, May 22, 2010

The weekend sewing disaster

Last weekend had such potential, at least with regards to my sewing. My mom had made plans to take my older son (4) for the day on Saturday, kind of a grandma-and-Cooper bonding time. This left my husband and I to split duty on only one kid! This is somewhat like winning the lottery, except I’ve never won so I wouldn’t know.

Sure enough, I was able to sew. I had a beautiful piece of light blue cotton/silk lawn with tiny white polka dots that I’d already cut out from Vogue 8252 a while ago, just sitting in my To Be Sewn projects box. Since I wanted to be able to take at least one handmade item to my meeting in Atlanta this week, this blouse seemed like it was going to be the most appropriate.

On a total sidenote, this pattern is now out of print. But it looks just like a lot of the blouses J Crew has in their current collection. Huh? I don't get pattern companies, that part is clear.

I decided to needle-down and was working with a Microtex super sharp needle in a 70. In hindsight, I could say a 60 would have been better, I think. Just a tip if you’re ever sewing on a cotton that’s very whispy, go sharp and go down in size. I find most gingham to be lighter than usual, too, and usually go down to a size 70.

Anyhoodle, I had made my way through most of the hard stuff. I'd checked the fit (that's when I made my husband take these pictures).


I'd even put the collar and collar stay on, at least three times. The first time I attached the collar band, I realized I'd omitted the most important part - the collar. So I took it off , took it apart, inserted the collar, and reattached the band. Sounds like fun, right? Yeah, I kind of wanted to scratch my eyes out by that point, but I was determined to keep sewing.

See, I was leaving for a weeklong meeting and for the first time in my life, I planned on wearing something I'd made at the meeting.

It was not to be.

Shortly after attaching the collar correctly, I decided to step over to my laundry machines and switch loads.

Right about this time, my two-year-old decided to step up to my project table with a tiny pair of scissors in his hand and take a swipe at my blouse.

I can still see my body, lurching across the room in slow mo. Screaming "nooooooooooo!!!!!" But it was too late.

The delicate voile had taken a hit, and it was in the worst possible place. I hole in the fabric about the size of a large plastic pin head, right under the face at the top of the button placket.

I don't know if you can see it or not, you may have to click the photo to enlarge it. It's there. It's not repairable, unless I somehow figure out another way to construct the blouse that would allow me to cut all that fabric off? The problem is the fabric is pretty sheer, so any type of interfacing or repairwork will show up like a gigantic Spongebob band-aid under my face.

So, I stopped sewing right then and there. I don't mean for life, I mean for that day, and on that project.

*sigh* Sewing and small children often don't mix well. They both take a very large amount of concentration. This weekend I haven't done any sewing at all because my husband and I were like ships that crossed in the night on Friday and I've been a single parent since I returned home, but I'm hoping next week will bring with it some down time worthy of working on one of my Jalie patterns, or anything else in my UFO box.

Tuesday, May 11, 2010

Stars on my arse

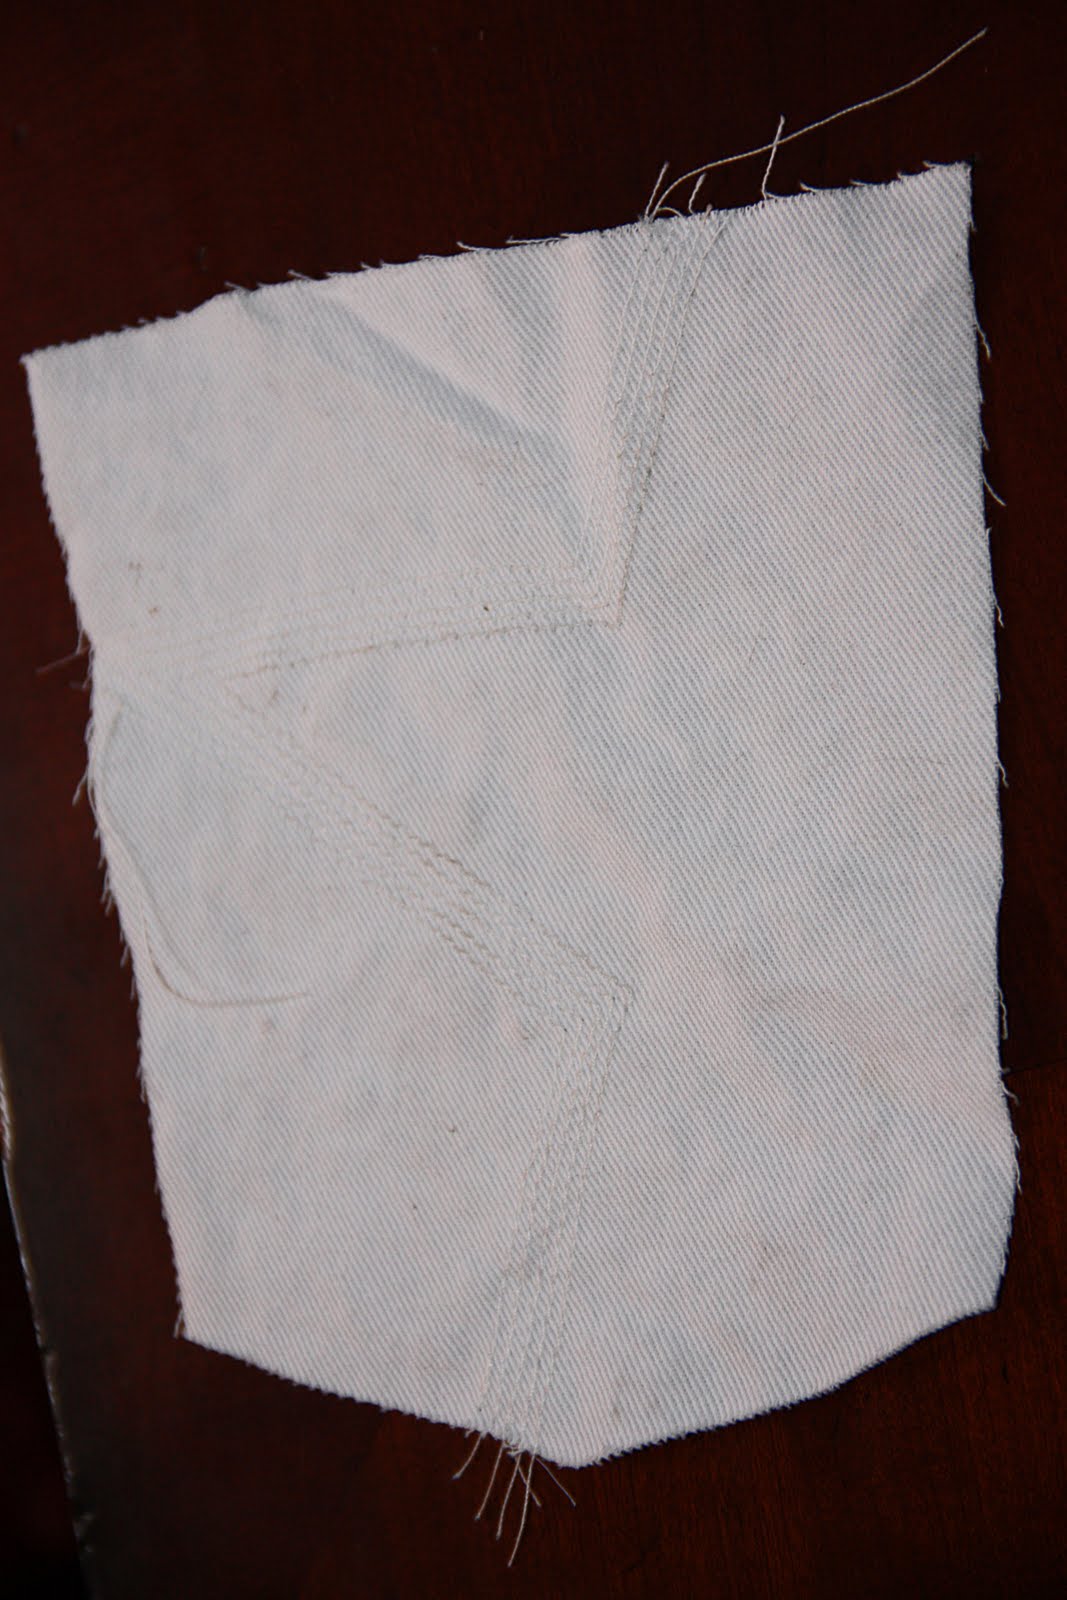
The back pockets are the first step on the Jalie jeans? Seems strange, but who am I to judge.

See, I knew there was a good reason to obsess over the pocket decoration before starting the project.

I copied the pockets on the "Bella" version of People's Liberation jeans. Here's an example from Ebay so you can see them.

You may have to click the picture to enlarge it to see the stitching? Or you may have to take my word for it.


It's really super hard to see on the white denim, and if I had any brain in my head I would have used graduated grays for the thread. But I don't. So the stars are white, which is fine for this pair. The next pair I'll practice more, I promise.


Oh, and check me out! I saw the prettiest cotton at Hancock's today when I was buying needles, and I refrained from hoarding buying it! Can you believe that?! It's like I'm getting better or something.

 
BLOGGER TEMPLATE BY DESIGNER BLOGS