
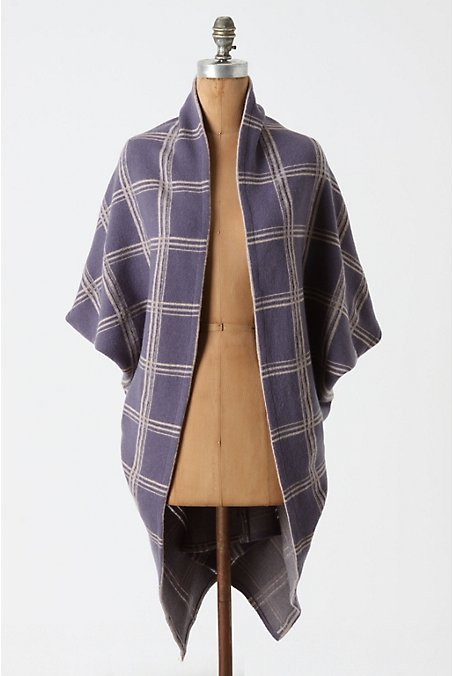
I stopped by Anthropologie the other day, just to see what was on sale and what this Spring is going to look like. I do shop there occasionally, but what with my whole "buy less, sew more" mantra these days, I am trying really super hard not to bring home anything I don't really really really need.
I did find something super darling, though! It's called the Dalsland wrap, and there was only one of them in the store. I totally scoped it out, even sitting down on their couch to take measurements and figure out how they constructed this doohicky. It's made out of a lovely substantial doubleknit.

Then I came home and scoped it out online some more, and then I made a prototype out of cream organic cotton sweatshirt fleece on my shelf.


The great news is that out of ten reviews, it gets almost five stars! The bad news is the prototype doesn't fit me, sadly, but I learned a lot from it and in my second try ~ voila! My own personal version of the Dalsland shrug in alpaca/wool/nylon yardage from my own stash (plus), and the whole thing cost me $12 instead of $118 (another plus).

Here's a quick tutorial, with diagrams instead of pics because it's a tad confusing.
I am a tall size 8 or 10 in RTW, so these measurements are based off of that and off of the Medium sized shrug in the store. The prototype I made would fit someone with smaller shoulders, maybe a 4-6?
You need a long strip of fabric, 24" wide by 116" long. I cut two pieces of sweater knit, each 24" wide by 58" long. Serge all four long edges. If you're buying yardage, that means you will need 1 1/3 of 60" wide fabric, and cut it in half.
Because I didn't have one continuous piece of fabric 100" long, I seamed my two 58" pieces in the middle, and made it a flat-fell seam because you may be able to see it when or if it folds over. This is optional (the flat-fell part, you really do need a seam).

Then fold the piece, right sides together, at the center back seam. You will be stitching closed the bottom 20".


Now for the hardest part, and it's not too hard. You will open up the piece by holding the center back seam and the seam you've just sewn in each hand, right sides together, matching the two seams up and pinning them together. Leave 9" (or more, this becomes your sleeve opening) open at each end, and stitch this seam closed.

To finish, turn under the serged edges 1/2" and stitch the hems down. I also stitched down a 1/2" around the armholes.
This is the easiest project! The hardest part is envisioning the "envelope" when you pull the two seams to the sides. The great thing about the Anthro site is you can zoom in on their finished product and actually see some of the construction of it.

I'd love to see if anyone else makes one of these wrap/shrugs/cardi/thingies!

Enjoy!
**Edit: I've added some additional thoughts on sizing and fabrics in a second post, here.
Way cute Heather, and what a savings!!
ReplyDeletePS Ruby is huuuuge!
Very cool Heather...thanks for the Tute! I think I will have to dig through the stash and whip one up too! Take that Anthropologie!
ReplyDeleteit looks awesome!!! and you look great too... love it!!! keep sewing girl!!!
ReplyDeleteVery cute!
ReplyDeleteLove it. I bought one last year in knitted wool on clearance for 5$ from Urban Behavior (Canada). But I love the look of making it out of jersey or fleece.
ReplyDeleteAlisha
hi, found you via one pretty thing...I so love this. I am not a size 4:( but my daughter is and she would love it she turns 12 on Saturday. If you still have the smaller one let me know and I could even pay shipping for you.
ReplyDeleteI will be trying to make one for myself with your diagrams
amy
Ickesa79@gmail.com
That is cute. I have 3 yards of some grey that I was going to make into stretch pants, but now i'm reconsidering. Perhaps this is why nothing ever gets done...?
ReplyDeleteThis is fantastic, thankyou for making this tutorial!
ReplyDeleteI love this!! I also saw this online and LOVED it, though I must say, yours is sooo much cuter! I wish I could sew,but alas it is not to be. if you ever start making/selling them- I would TOTALLY buy one! ill supply the material and everything!!
ReplyDeletegreat share, thank you!
Jenn Post
noblekatt(at)hotmail(dot)com
OK, so I dearly, dearly love this. I love wraps and shawls anyway. But I have to admit I seem to have gone totally dim because I read through this like six times and cannot make heads or tails of it! I got a serger for christmas and would LOVE to try one. ::stumbles off to read it once more time::
ReplyDeleteSeen this?
ReplyDeletehttp://uniformnatural.com/journal/origamiwrappattern.pdf
I made this!! It's super cute! I used the grey and red that you recommended on the next post. I love it! Thanks for the tutorial!
ReplyDeleteI am having lots of trouble with step #3 ....help PLEASE!!!!!
ReplyDeleteI just made this today, and it's adorable!
ReplyDeleteI just found this post on Pinterest. Thank you so much! I have knitted one of these (from Stitch Diva) and have long wondered how I could sew one. Now I just have to wait for winter to have a go :)
ReplyDeleteThanks for this tutorial. My Mom received this shrug, didn't like it,deconstructed it then gave it to me. I have been folding and pinning forever and finally have it out back together because of this. Awesome! Now I will make another.
ReplyDelete